How to hide files and folders in Windows 10

Hiding files or folders in Windows 10 is a simple trick and one that has some security benefits. It can also be useful for hiding surprise birthday party preparations or other content you don’t want others to see. While far from fool proof, hiding files and folders is an extra step you can take to add an extra level of secrecy to your computer.
Hiding files or folders won’t stop you losing data or prevent a hacker from finding your secret preparations for world domination but it will stop casual snooping. Unless the person looking around your system knows Windows well, they won’t suspect you are hiding something behind Windows Explorer.
For that alone, this trick is well worth using. That isn’t all you can do though. I’ll show you how to take this one step further for true security.
Hiding files or folders in Windows 10
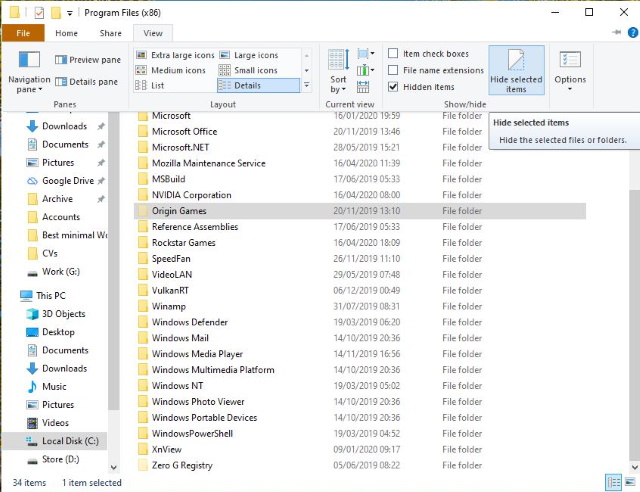
Hiding files or folders in Windows 10 is very straightforward once you know where to look. It uses standard Windows Explorer commands to hide the resource from view and a simple toggle to show or hide hidden resources.
- Open Windows Explorer and navigate to the file or folder you want to hide.
- Select the file or folder so it is highlighted.
- Select the View menu from the top of Explorer.
- Select Hide Selected Items from the menu list.
- Make sure the Hidden Items box is unchecked next to it.
As long as Hidden Items is not checked, the resource you selected should now disappear from view. When you want to find that resource again, select either Hide Selected Items again to disable it or check the Hidden Items box to make it visible.
That’s it!
You can do this with any type of file or folder. Newer versions of Windows 10 won’t always ask you if you want to include all contents of a given folder but older versions might.
Securely hide files or folders in Windows 10
If you have resources you really don’t want others to find, you can use a more secure method than the above. We are still using Windows tools but we instead use the command line to turn the resource into a system resource and then hide it. Even if you select Hidden Items in Explorer, Windows will still keep the file hidden.
The downside is that you will have to repeat these steps to be able to access the resource again.
- Type CMD into the Windows Search box and select Command Prompt.
- Type ‘attrib +h +s’ plus the full location of the resource you want to lock down.
- Hit Enter.
In the example, I am hiding the Origin Games folder on my C: drive. Therefore I typed ‘attrib +h +s C:\Program Files (x86)\Origin Games’. This turns that folder into a system folder and hides it.
To be able to access the folder again, you would need to repeat the same process above but type ‘attrib -h -s’ plus the full path to make it accessible again.
This isn’t the most secure way to hide files or folders on a computer but it is a way to hide them from casual eyes. If you wanted to take it another step further, you could password protect the resource or encrypt it before hiding it. Then you really have secured your data!


